Wednesday, September 30, 2009
Three in one day... wow!
Go look at Lila Tuellers blog she is giving away a set of Jelly Roll and Layer Cake of her new fabric line "Eden". http://lilatuellerdesigns.blogspot.com/ go go go ....
Tutorial: Tessellating Stars from Jelly Roll Strips and a Give Away!
If anyone has a question or finds a problem with my instructions please email me (jewelsarmcandy at Gmail dot com).
When finished with this portion you should have something that looks like this:


Directions:


2. Mark a line with a chalk pencil or erasable marker from the top left corner of the star fabric to the bottom right corner for the sky fabric.


5. Press (I like to press toward the star fabric but it doesn't matter which way you do it).


When finished with this portion you should have something that looks like this:

Fabric needed for this entire project (including the houses):
1 1/2 yd Moda Marble in Indigo (or whatever you want for your night sky)
17 Jelly Roll Pieces (9 brights for stars, 3 green for lawns and tree. 1 brown for tree trunk, 4 for house trim, doors and windows) I used Simple Abundance by Bonnie and Camille for Moda
8 pieces of a layer cake (4 roofs,4 main houses) I love Simple Abundance!
Important: Cut only the tiniest bit from the selvage of both your sky fabric and your Jelly Rolls you will need all of the width of the strips to get the stars out of them.

Directions:
1. Cut 10 strips from Sky fabric 2 1/2" by WOF
Subcut 36- 2 1/2" x 6 1/2" Rectangles
36- 2 1/2" x 5" Rectangles

2. From each of your 9 star Jelly Roll strips
Subcut 4- 2 1/2" x 6 1/2" Rectangles
4- 2 1/2" x 4" Rectangles

Tip: When I have certain sizes of strips to cut I mark my ruler with paper at the different lengths. This keeps me from having to check my ruler 5 times before I cut. (Yes, 5 times I am OCD)

1. Place a 4" piece of star fabric on top of a 5" piece of sky fabric as shown below.

(This is just to show that they are lined up along the right hand edge)


3. Sew on the marked line (I re-marked in blue so that it would be more visable in the picture)

4. After it is sewn place your ruler so that the 1/4" mark is on the stitched line and cut off the corner. (My red arrow shows where the stitching is. Be careful to only cut off the corner it should be a triangle you are cutting off).


5. Press (I like to press toward the star fabric but it doesn't matter which way you do it).

6. Sew a 2 1/2 x 6 1/2" rectangle to the side of the unit you just made. Make sure that you sew the shortest part of the star fabric in the first unit to the long piece of star fabric as you see below and press.

Seventh Inning Stretch
7. Sew one of the 2 1/2" x 6 1/2" pieces of sky fabric to the opposite side of the first unit as seen below and
press.

Yeah! That is all there is to it.
8. Do this again 35 times until you have 36 blocks like this. You should have 4 of each star fabric.
9. Rearrange and turn the blocks so that they are set like this:

10. Sew each star from these four blocks (they should total a block that is 12 1/2" square) then set them in three rows of three so that your growing quilt looks like the one at the top.
I will give you a few days to work on this and be back after the weekend with the directions for the houses as well as a printable sheet to plan tesselating stars and make all of the stars out of seperate fabrics (without the same color for all of the sky).
Ready For The Give Away???
Just leave a comment here about what fabrics you would like to make the stars out of. The winner will receive 9- 2 1/2" strips of Simple Abundance to get their stars started (bright pretty ones... of course they are all pretty. Have a mentioned I love Simple Abundance? I thought so). Comments must be received before midnight PST on Wednesday October 7th. You can get two entries if you blog about the tutorial or the Give Away on your blog. Just let me know that you blogged it... thanks.
Another bite of Schnibble cake...
I thought I would post a couple of less busy pics of my busiest quilt ever. Seriously it is crazy busy. Funny story, about these pics, I didn't have anything holding the quilt to the fence it stayed up there all by itself with the help of a little breeze. First tiny huge bite of tutorial will be up in a couple minutes. Take a look at my post for the tutorial even if you don't want to make the quilt... I am adding a give away!


Saturday, September 26, 2009
Coming soon to a blog near you....
I am going to be posting a tutorial here on my blog for this:
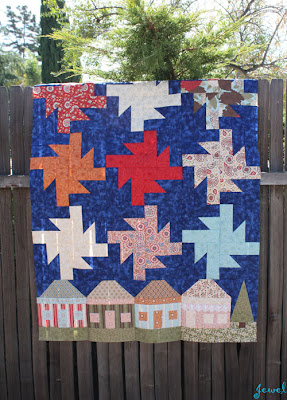
Abundant Stars and Simple Houses

It is made from a Jelly Roll and Layer Cake, in Simple Abundance, and a yard of Moda Marble. I am going to post the tutorial in bite size pieces starting with the stars on Monday Wednesday (foiled again). Hope to see you here!
Saturday, September 19, 2009
WooHoo my September Schnibble is finished...
This one seriously gave me fits... right down to ironing the binding (where instead of ironing the fabric I ironed my fingers). It all went together fine but it seemed to fight me every step. It is super busy but very Christmasy out of "Figgy Pudding".


And a close up of what I did with the quilting... instead of the geese getting all of the attention I decided to make the squares the focus....

Tuesday, September 15, 2009
Just a titch...

This is just a bit of what I have been working on. There are a couple of things I can't show because they have to be "Revealed" :) Anyway, on the back a Christmas table runner from a Moda Bake Shop tutorial.
To the left a "Simple Abundance" layer cake and jelly roll. Speaking of "Simple Abundance" pictures do not do this line justice it is so rich and gorgeous. The red tone on tone floral is literally my favorite red piece of fabric ever (and that is saying a lot) red is my favorite color. It is amazing and I took this picture at noon, half of those bits are cut already. I can't wait until the yardage comes out.
To the right are the disappearing nine-patch blocks I made out of "Authentic" for (I can't tell) for Christmas. I am currently waiting for the yardage to be available because there is a specific print I want to use for the sashing.
A giveaway at V and Co...
I promise some pictures later today of my recent projects...but for now go check out This Blog she is giving away something really fun. I answered her question about what I wanted from "The Quilt Shoppe" to enter. Here is what I chose Happy Flowers
Saturday, September 12, 2009
I have Schnibble Completeness
I made my little Schnibbly quilt for the club. It was a struggle all the way... don't you hate when one just doesn't want to go together? It is very bright and busy but much better with the borders holdng all the busy inside. I got half way through and was really worried as it was quite schizophrenic. But it all came together in the end. I will get it quilted this week and hopefully have a pic of it next Saturday.
Friday, September 11, 2009
We Remember....
On this day when we remember tragedy I just wanted to take a moment to remember our all volunteer armed forces. No matter where you stand on the political spectrum you can't deny that they put their lives on the line for their country everyday, willingly. So to our military men and women, no matter where you serve, thank you!


Saturday, September 5, 2009
Salsa Recipe....
I don't have pictures sorry... it is red with green stuff in it... hehehe...
I just made Salsa for our Labor Day BBQ with our Small Group from church. So I thought if you didn't already have a tried and true recipe you might like one...watch out this doesn't taste like it came from a jar.
Ingredients:
1 large can of whole peeled tomatoes (or 3-4 fresh tomatoes blanched and peeled)
2-4 cloves of garlic (depends on how much you like garlic, I never use less than 4)
1 cup of fresh Cilantro
1 lime
2 green onions
1 Jalapeno
Directions:
It helps if you have a food procesor. If you don't you will need a sharp knife and everytime I say pulse you chop (a lot). Clean and chop green onions into large pieces (about 2 inches. Cut stem off of Jalapeno slice top to bottom remove the seeds and insides and rinse. Rinse and cut stems from Cilantro,you want one cup after this has been done(not packed). Peel garlic cloves. In food processor combine green onions, garlic, cilantro and Jalapeno (if you do not like spicy only use 1/3 to 1/2 of the pepper) pulse until all ingredients are finely chopped. Slice lime in half squeeze one half into mixture. Drain juice from tomatoes and place all into food processor. Pulse until all ingrediants are well chopped and combined. Refrigerate for a day to have all flavors combine. Yield approximately 2 cups.
I have been busy...really!
Sorry it has been so long since my last post. I have been sewing away... so much so that I haven't wanted to stop and take pictures. I have more pictures to take today but here are a few to start the morning with.
I joined John for the "Wonky Log Cabin" quilt along. Here are my first two blocks.
#1

#2

I like #2 best. I think I was too worried about where I was placing fabrics in the first one.
I also joined the Block Lotto and did these stars for the September Lotto:

I joined John for the "Wonky Log Cabin" quilt along. Here are my first two blocks.
#1

#2

I like #2 best. I think I was too worried about where I was placing fabrics in the first one.
I also joined the Block Lotto and did these stars for the September Lotto:

Subscribe to:
Posts (Atom)