Pages

Monday, February 14, 2011

3Cs Quilt Along Row 2... and Feeling Groovy

Hi Everyone,

Ready for Row 2? This is the easiest of them all... I think it took me 10 minutes including cutting...

PS. Check the bottom of the post for a little sneaky peek of something else I am working on today.

1. Cut an 8 1/2 inch by WOF strip From your background fabric.
.

2. Subcut your strip into:
    2-  3 3/4" by 8 1/2" rectangles
    5- 7" by 8 1/2" rectangles 
(this is all I had left after the sub-cutting of my strip... just so you know you may have to cut an extra strip if your fabric is a bit narrow)


3. Cut one 2 1/2" strip trim to 42 1/2" in length


4. Cut 6- 1" by 8 1/2" rectangles of the fabric you are using for your lollipop sticks. (I love dots... in case you didn't already know that)

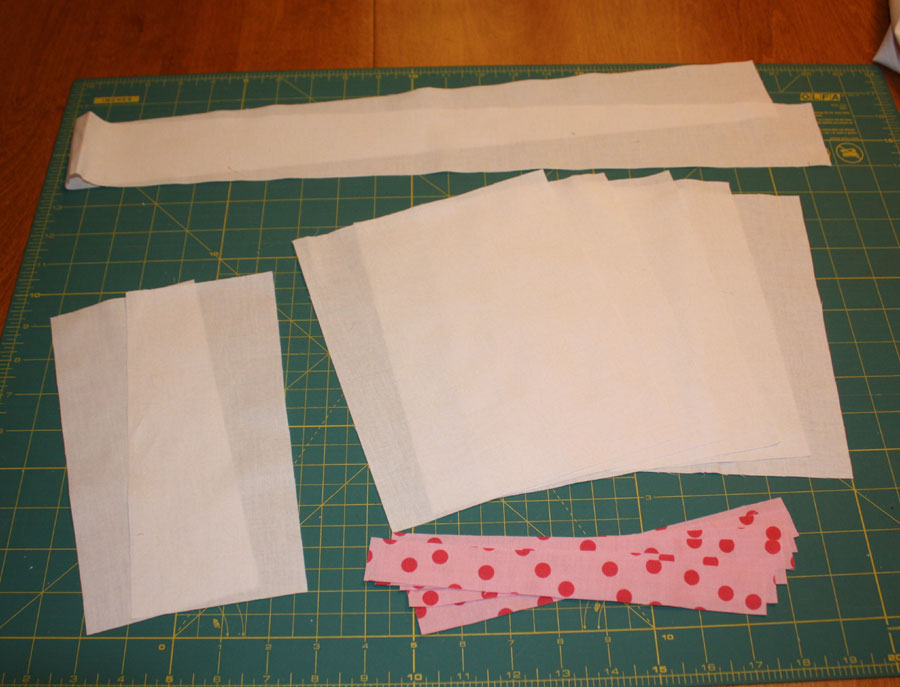
Here are all of your pieces for this row

 5. Using a 1/4 inch seam sew your back ground rectangles and stick rectangles in this order:


Press toward the sticks

6. Sew the 2 1/2 inch strip to the bottom of the sticks and the lollipop tops to the top of the sticks.

Voila! Your first two rows are done and you have lollipops!


Here is a little sneak peak of something I am working on today... Are you Feeling Groovy?


Friday, February 11, 2011

I Am A Guest so... Be My Guest...

Hey Everyone!

Today is the day! My first tutorial for The Quilted Fish went live this morning... Come on over and check it out.

PS. Monday Amanda will be offering kits to make the bracelet as well as the cute pillow that KarrieLyne posted for her last Friday.

Thursday, February 10, 2011

Sneaker Peeker....

Here is a little sneaky peeky of my tutorial that will be on The Quilted Fish's blog tomorrow morning. Can't wait to see you all there.

Wednesday, February 9, 2011

Frame finishing tutorial...Part 1

Hi Everyone,

I am still having technical difficulties with the second method's pictures so I am going to redo them all today. In the mean time here is the first method of finishing those adorable frames.


1, Choose a few strips of fabric or scraps and make a piece of your own fabric from them. I decided to use some 2 1/2 inch strips from my scrap bin in pinks and reds for Valentine's day. Make sure that you have 2" to 3" larger than your frame when you are finished piecing them together.
2. take your piece of cardstock or poster board and draw around your frame on the outside and on the inside of the opening. You will need to do this twice and cut two pieces. Laying aside one piece for use on the back of the frame.


3. Cut out each piece just inside the marked line on the outside of the frame and outside the marked line on the center, in other words you are cutting off your marked line.


4. Lay one of your cardboard pieces on your sewn piece of fabric making sure there is at least 1" on all sides.


5. Place your ruler on the template and past the edge by 1" cut all the way around. The easiest way to do this is leave the piece in one place and rotate your cutting mat. Then you won't have to reposition the pieces each time you cut.


When you are done it will look like this.

6. Turn the fabric over and on the wrong side, with the cardboard centered, mark all the way around the outside. (You will see in the second photo I marked the inside too but that isn't necessary I realized later.)


7. Take a scrap of batting the same size as the frame and lay it on the back side of the fabric so that it is inside the drawn line. You do not want your batting to be larger in this case because it will make it more difficult to wrap around the frame.

8. Pin baste in your preferred method, I like to use straight pins on small items because they are easier to remove when I am quilting.

9. I am sorry I didn't get a picture of this, but I straight line quilted 1/4 inch away from each seam on both sides. You can see the quilting in the finished picture at the top. Quilt as desired.

10. Place the cardboard back on top of the batting and mark around the inside of the frame/heart.


11. Cut out the center leaving approximately an inch inside the marked line.


12. Clip the corners to within 1/4 inch of the marked line.


13. Place the cardboard back on the batting. Get your amazing wonder glue (E-6000) and start turning the inside of the frame one clipped piece at a time. This take a little patience because the glue doesn't dry super fast. The best way to do this if you don't have a ton of patience is to use binder or large paper clips to hold the pieces down while they dry. This glue is not like super glue in that it won't glue your fingers together but it will get on them and dry. It is rubbery so you can peal it off or rub it off. Once it is dry it is water proof and super strong. You might have toput a little extra under the batting because it seams to absorbe the glue and a little under the fabric to hold it to the batting.


14. Once you have the inside of the frame fabric glued to the cardboard. Glue the rightside of the frame to the inside of the cardboard. I put glue around the center and around the outside... I was working fast so didn't get a picture of the glue on the outside.


It will look like this.


15. Put a dab of glue on the each corner of the frame and fold the corners in as shown in the photos.


16. Glue all of the edges around the frame.


17. Take the second piece of cardboard that you cut and trim the inside of the frame about 1/4 inch so that it fits around the iside clips. Since the frames don't have a back you need to leave the wholce center open to put a picture in it. Make sure that the sides and the center are slightly smaller than the frame, once you have the backing fabric on you don't want it to show from the front of the frame.


18. Cover the cardboard the same way that we did earlier with the cardboard and frame. I just used one pice of fabric for this.


19. Glue the back to the frame.


All done! Ain't she cute?


Tuesday, February 8, 2011

The frame finishing tutorial... and TTT

I am sorry I am having technical difficulties so the frame tutorial will be a day late. See you tomorrow morning with 2 ways to fix up that frame.

For TTT... another 1/2 lb down. Yay!

Monday, February 7, 2011

She's Done it Again!

Hi Everyone,

Look at this amazing line of fabric "Sugar and Spice" By Amanda Herring of The Quilted Fish. She only used every one of my favorite colors red, green, and aqua... All my dreams have come true :) I can't wait to get my grubby fingers on it :)


First Row of the 3C's Quilt Along


Hi Everyone,

So glad to see you here... are you ready to get started?

If you are worried about having enough fabric for the borders you might want to cut them first. The inside borders (blue dots) are 1 1/2 inches by your row width (this might vary depending on your 1/4 inch seam) it should be about 44 1/2 for the top and bottom and the sides should be 1 1/2 by 45 1/2. The second (outside border) should be 4 1/2 by 52 1/2 for the top and bottom and 4 1/2 by 47 1/2 for the sides. 
The first row is the top of your Lollipops:

1. Choose six fabrics to represent the tops of your lollipops. Cut one 7 1/2 inch square from each fabric. If you are working from small pieces you might want to cut them like this:


rather than by cutting strips first.( It is easiest to do this by rotating your mat as you make your cuts.)

2. Cut 24- 2" squares of background fabric. It takes 2 WOF strips to get 24 squares. Later on you will need more 2" squares so if you would like to cut them all at once you will need a total of 48, 24 for this row and 24 for row 5. I cut 3 WOF strips to give me the 48 and put my extras in a zip lock bag labeled row 5. When you are done you should have a pile that looks like this. (Somehow I missed getting the blue dot lollipop in the picture so you should have 6 pieces not five like my pictures shows.)


3. Place your ruler diagonally on the wrong side of the background squares and draw a line with your pencil. Repeat for all 24 squares. (If you already know how to make snowball blocks you can meet us at step 5.)


Your squares should look like this:


4. Place one background square on the corner of a lollipop square as shown, and sew on the marked line.


5. Sew again 1/2 inch away from the marked line toward the outside of the corner.


6. Cut the corner apart half way between the two rows of stitching. Set the half square triangles aside we are going to use them at the end to make our label. Repeat for all four sides of the blocks.


7. Turn the corners out and press. If you know what order your lollipops will be in then iron every other block toward the lollipop and every other block toward the corner. That will make it easier for you to sew them together and match seams.


8. When you are done pressing you should have 6 blocks that look like this. Lay them out in a pleasing order and sew them together matching seams.


Ta Da your first row! I told ya it was easy :) If you have any questions don't hesitate to ask.

Printable PDF located here.
I created a Flickr pool if anyone wants to put pictures there of your project. Click Here.